Recently I have written articles on image processing and on SSE, so here is an article on image processing AND SSE!
SSE for Image Processing
SSE instructions are particularly adapted for image processing algorithms. For instance, using saturated arithmetic instructions, we can conveniently and efficiently add two grayscale images without worrying about overflow. We can easily implement saturated addition, subtraction and blending (weighted addition) using SSE operators. We can also use floating point SSE operations to speed-up algorithms like Hough Transform accumulation or image rotation.
In this article we will demonstrate how to implement a fast dilation algorithm using only a few SSE instructions. First we will present the dilation operator, afterwards we will present its implementation using SSE, and finally we will discuss about the performance of our implementation.
Dilation
Dilation is one of the two elementary operators of mathematical morphology. This operation expands the shape of the objects by assigning to each pixel the maximum value of all pixels from a structuring element. A structuring element is simply defined as a configuration of pixels (i.e. a shape) on which an origin is defined, called the center. The structuring element can be of any shape but generally we use a simple shape such as a square, a circle, a diamond, etc.
On a discrete grayscale image, the dilation of an image is computed by visiting all pixels; we assign to each pixel the maximum grayscale value from pixels in the structuring element. Dilation, along with its dual operation, erosion, forms the basis of mathematical morphology algorithms such as thinning, skeletonization, hit-or-miss, etc. A fast implementation of dilation and erosion would therefore benefit to all these operators.
Scalar Implementation
The scalar (without SSE) implementation on a grayscale image is done by using an array of offsets in the image as the neighborhood. For our implementation we have used 4-connexity as illustrated below:

The red pixel is the center, and the blue pixels forms the structuring element.
In order to avoid losing time when dealing with borders, each image has extra pixels to the left and to the right of each row. The number of additional rows depends on the width of the structuring element. There is also a full additional row before and after the image data. Thus, a dilation can be computed without having to handle borders in the main loop.
// Image is just a structure containing the size of the image and a pointer to the data. void dilation(const Image& src_, Image& dst_) { int width = src_.width; int height = src_.height; // Step is the size (in bytes) of one row (border included). int step = src_.step; dst_.resize(width, height); uint8* dst = dst_.value_ptr; // uint8 is a typedef for unsigned char const uint8* src = src_.value_ptr; const size_t wsize = 5; // The structuring element. const int off[wsize] = { -1, +1, 0, -step, +step }; for (int i = 0; i < height; ++i) { for (int j = 0; j < width; ++j) { uint8 sup = 0; for (int k = 0; k < wsize; ++k) sup = std::max(sup, src[j + off[k]]); dst[j] = sup; } dst += step; src += step; } |
SSE Implementation
Using the SSE function _mm_max_epu8 it is possible to compute the maximum on 16 pairs of values of type unsigned char in one instruction. The principle remains the same, but instead of fetching a single value for each offset value, we fetch 16 adjacent pixels. We can then compute the dilation equivalent to 16 structuring elements using SSE instructions.
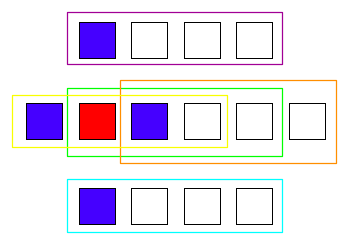
We need to perform 5 SSE loads for our structuring element, as illustrated in the following image (but with 4 pixels instead of 16). Each rectangle corresponds to a SSE load. By computing the minimum of each groups of pixel and storing the result in the destination image we have perform the dilation with 4 consecutive structuring elements.

Regarding the implementation, it is really verbose (as always with SSE!), but still short, we only need to change the inner loop.
for (int j = 0; j < width - 16; j += 16) { // 2 unaligned loads. __m128i m = _mm_loadu_si128((const __m128i*)(src + j + off[0])); m = _mm_max_epu8(m, _mm_loadu_si128((const __m128i*)(src + j + off[1]))); // 3 aligned loads: more efficient. m = _mm_max_epu8(m, _mm_load_si128((const __m128i*)(src + j + off[2]))); m = _mm_max_epu8(m, _mm_load_si128((const __m128i*)(src + j + off[3]))); m = _mm_max_epu8(m, _mm_load_si128((const __m128i*)(src + j + off[4]))); // Store the result in the destination image. _mm_store_si128((__m128i*)(dst + j), m); } |
We have used an aligned SSE load for the center and the pixels above and below the center. As mentioned in previous articles, using aligned load improves performances.
Performances
We have measured the performances of the SSE implementation against the scalar implementation on a Intel Core2 Duo P7350 (2 GHz). Two grayscale images of Lena were used.
| 2048 x 2048 | 4096 x 4096 | |
| Scalar | 50 ms | 196 ms |
| SSE | 7.5 ms | 31 ms |
Using SSE, we managed to obtain a speedup factor of 6 compared to the scalar implementation!
Efficiency
Our algorithm runs pretty fast but it could be even faster! If we perform the dilation in-place, the code runs twice as fast as the previous implementation. If it's still not fast enough for your needs, you can also implement the algorithm directly in assembly using advanced techniques such as instruction pairing, prefetching... A good step-by-step tutorial on the subject can be found here for 4x4 matrix-vector multiplication.
Comments are closed.