Category Archives: OpenCV

Project - Barcode segmentation and decoding

In the 3 previous articles I explained how to develop a really simple barcode decoding algorithm. This program was really naive and only worked with really clean barcodes.
As an assignment for a school project, a more advanced version was developed. The program can now detect and decode EAN13 barcodes in large images with various objects and different backgrounds.

Demonstration

Here are the output images of the program. Red rectangles indicates that the segmentation phase detected a potential barcode but the decoding phase rejected it. Green rectangles indicates that a barcode was found and correctly decoded (using the check digit equation, we can detect most decoding errors).

Click on the images for a better view of the output.

As you can see, there were some vicious images :), especially the one with the wooden floor that totally messed up our segmentation, fortunately, the decoding process rejected all those potential barcodes.

The barcodes themselves are sometimes really noisy. If you zoom on some of them you will notice there are large changes in illumination, a low resolution, low contrasts... These problems required an approach much more robust than the one described in the previous articles.

OpenCV - UPC Barcode Reader Part 3

After explaining how the UPC system works in Part 1, I have shown how to decode a digit from an image in Part 2 of this serie. In this article I will now demonstrate how to read the entire barcode.

Helper functions

We will need other helper functions for this last task.

We need a function to skip the quiet zone, skip_value advances the scan pointer to the guard pattern

void skip_quiet_zone(const Mat& img, cv::Point& cur)
{
  while (img(cur) == SPACE)
    ++cur.x;
}

We need a function to read the left guard and return the smallest width.

unsigned read_lguard(const Mat& img, cv::Point& cur)
{
  int widths[3] = { 0, 0, 0 };
  int pattern[3] = { BAR, SPACE, BAR };
  for (int i = 0; i < 3; ++i)
    while (img(cur) == pattern[i])
    {
      ++cur.x;
      ++widths[i];
    }
  return widths[0];
}

Here I only return the first width but the best would be to compute the mean. Even better would be to scan the right guard and compute the mean/median of all values. This would be much better for noisy images.

We also need a function to skip the middle guard, note that we don't care about the width right now.

void skip_mguard(const Mat& img, cv::Point& cur)
{
  int pattern[5] = { SPACE, BAR, SPACE, BAR, SPACE };
  for (int i = 0; i < 5; ++i)
    while (img(cur) == pattern[i])
      ++cur.x;
}

Reading the barcode

We have everything we need, the rest is simple: we load the image, we invert it, threshold it, we compute the smallest width with the left guard, we read the 6 left digits, the middle guard, the 6 right digits and that's all ! At the end we print the decoded sequence.

void read_barcode(const std::string& filename)
{
  Mat img = cv::imread(filename, 0);
  cv::Size size = img.size();
  cv::Point cur(0, size.height / 2);
 
  cv::bitwise_not(img, img);
  cv::threshold(img, img, 128, 255, cv::THRESH_BINARY);
  skip_quiet_zone(img, cur);
 
  pattern_map table;
  setup_map(table); // presented in part 2.
 
  int unit_width = read_lguard(img, cur);
  display(img, cur);
 
  std::vector<int> digits;
  for (int i = 0; i < 6; ++i)
  {
    int d = read_digit(img, cur, unit_width, table, LEFT);
    digits.push_back(d);
  }
 
  skip_mguard(img, cur);
 
  for (int i = 0; i < 6; ++i)
  {
    int d = read_digit(img, cur, unit_width, table, RIGHT);
    digits.push_back(d);
  }
 
  for (int i = 0; i < 12; ++i)
    std::cout << digits[i];
  std::cout << std::endl;
  cv::waitKey();
}

Going further

This reader is simple and far from perfect. There are numerous ways to improve it:
- Use several scan lines. For each bit, compute the median of the intensity found by each scan line.
- We assume we always have a match in our decoding table, we should rather compute the distance to each binary sequence and we should choose the digit with the lowest distance. If we have no digit with a low distance, we can try several digits and see which one satisfies the check digit equation.
- ...
But without doubts, the toughest problem with barcode reading will be concerning preprocessing. The input can be noisy, blurry, skewed, scratched...

OpenCV - UPC Barcode Reader Part 2

In the previous article I explained the basics about the UPC barcode system. In this second part I will show how to read an encoded digit.

UPC Reader

Principle

How are going to decode our image ? That's pretty simple, we perform an horizontal scan of our image.
First of all we read the guard in order to find the smallest width and after we read the 6 left digits, the middle guard again and the 6 right digits. To read a digit we read 7 bits and lookup the corresponding digit in a lookup table. Simple !

Digits encoding

First of all we need to store the left and right encoding of each digit, for this purpose we need a std::map (just one because right-encoding is the bitwise complement of left-encoding). The map associates a binary encoding to the value of the digit.
In C++ you can't directly write a binary value (but you can write an hexadecimal value), so I could have just converted the binary sequence in decimal, but for readability I prefer to express the value directly in binary. After a bit of searching I stumbled upon this handy macro:

#define Ob(x)  ((unsigned)Ob_(0 ## x ## uL))
#define Ob_(x) (x & 1 | x >> 2 & 2 | x >> 4 & 4 | x >> 6 & 8 |		\
	x >> 8 & 16 | x >> 10 & 32 | x >> 12 & 64 | x >> 14 & 128)

To convert the binary sequence 0001101 just write Ob(0001101) !
Here is the code to setup the table:

typedef std::map<unsigned, char> pattern_map;
 
void setup_map(pattern_map& table)
{
  table.insert(std::make_pair(Ob(0001101), 0));
  table.insert(std::make_pair(Ob(0011001), 1));
  table.insert(std::make_pair(Ob(0010011), 2));
  table.insert(std::make_pair(Ob(0111101), 3));
  table.insert(std::make_pair(Ob(0100011), 4));
  table.insert(std::make_pair(Ob(0110001), 5));
  table.insert(std::make_pair(Ob(0101111), 6));
  table.insert(std::make_pair(Ob(0111011), 7));
  table.insert(std::make_pair(Ob(0110111), 8));
  table.insert(std::make_pair(Ob(0001011), 9));
}

Now we need an...

Helper function

We will need a small helper function in order to assist us while reading a digit.
First of all we will use the following typedef, because we will only be using grayscale/B&W images:

typedef cv::Mat_<uchar> Mat;

And the two following define (remember we always invert the colors so bars are white !)

#define SPACE 0
#define BAR 255

In all following functions, the cur variable is the position of our horizontal scan pointer.

The following function is really helpful in order to prevent error from accumulating after reading a bit.

For example left-digits always end with a '1' bit and we always begin with a '0' bit, therefore if after reading a digit we are still on a bar, we need to advance our scan pointer until we reach the beginning of the next digit. Also, if the previous bit is '0', we have gone too far and we need to decrease our scan pointer in order to be perfectly on the boundary between the two digits.
The situation is reversed for right-digits.

void align_boundary(const Mat& img, cv::Point& cur, int begin, int end)
{
  if (img(cur) == end)
  {
    while (img(cur) == end)
      ++cur.x;
  }
  else
  {
    while (img(cur.y, cur.x - 1) == begin)
      --cur.x;
  }
}

Reading a digit

We now have almost everything we need in order to read a digit, we just need an enum indicating if we are reading a left or a right-encoded digit.

enum position
{
  LEFT,
  RIGHT
};
 
int read_digit(const Mat& img, cv::Point& cur, int unit_width,
	       pattern_map& table, int position)
{
  // Read the 7 consecutive bits.
  int pattern[7] = {0, 0, 0, 0, 0, 0, 0};
  for (int i = 0; i < 7; ++i)
  {
    for (int j = 0; j < unit_width; ++j)
    {
      if (img(cur) == 255)
        ++pattern[i];
      ++cur.x;
    }
    // See below for explanation.
    if (pattern[i] == 1 && img(cur) == BAR
	|| pattern[i] == unit_width - 1 && img(cur) == SPACE)
      --cur.x;
  }
 
  // Convert to binary, consider that a bit is set if the number of
  // bars encountered is greater than a threshold.
  int threshold = unit_width / 2;
  unsigned v = 0;
  for (int i = 0; i < 7; ++i)
    v = (v << 1) + (pattern[i] >= threshold);
 
  // Lookup digit value.
  char digit;
  if (position == LEFT)
  {
    digit = table[v];
    align_boundary(img, cur, SPACE, BAR);
  }
  else
  {
    // Bitwise complement (only on the first 7 bits).
    digit = table[~v & Ob(1111111)];
    align_boundary(img, cur, BAR, SPACE);
  }
 
  display(img, cur);
  return digit;
}

After reading a bit we are using a little trick in order to increase accuracy:
- if we have read only 1 bar and it was the last pixel, we are probably reading the following bit, so move backward by one pixel.
- if we have read only bars except the last pixel, we are probably reading the following bit, so move backward by one pixel.
Warning: I assume here that the smallest width is not 1. This trick should scale with the value of the smallest width.

And now read part 3 for complete decoding !

OpenCV - UPC Barcode Reader Part 1

As a school project we are assigned to find and decode barcodes in an image. For this project I will be teaming with Julien Marquegnies. This is the first article of a (perhaps) long serie.
As a first draft, this morning I quickly developed a program to decode UPC barcodes. I used OpenCV for loading and displaying but I don't use any advanced function from the library so the code can be quickly adapted to other use cases.

Universal Product Code

UPC is a standardized type of barcode used for scanning goods in stores. Here is an example of a UPC barcode:


First of all, we need to explain how UPC works.

Quiet Zone

To the left and to the right of the barcode we have a large area of white called the quiet zone. This zone is required to be at least 10 times the width of the smallest bar and is here to facilitate barcode detection, it has no interest for decoding.

Guard patterns

We can notice that the same pattern at the left, at the middle and at the right of our barcode:


This patterns is called the guard. The three occurences of this pattern are called (from left to right) S, M, and E (Start, Middle and End). S and E are encoded with 3 bits and the pattern is bar-space-bar. M is encoded with 5 bits with the pattern space-bar-space-bar-space.

Left and right digits

Between S and M we have the left digits and between M and E we have the right digits. Each digit is encoded on 7 bits, giving a total of 84 bits encoding digits, and 11 bits encoding guards.

Left and right digits are encoded differently: the right encoding scheme is the bitwise complement of the left encoding scheme.

The concept of bits for a visual pattern might be unclear, so let me explain: by reading the guard we have determined the width of the thinnest bar, in order to read a digit we read approximatively 7 * width pixels, at each time, if we encountered a bar the current bit will be 1 and 0 otherwise. The encoding of each digit is presented in the following table:

Digit L-code R-code
0 0001101 1110010
1 0011001 1100110
2 0010011 1101100
3 0111101 1000010
4 0100011 1011100
5 0110001 1001110
6 0101111 1010000
7 0111011 1000100
8 0110111 1001000
9 0001011 1110100

Let's zoom on the beginning of our example code, at the left we have our guard pattern and just after we have the first encoded digit.


After reading the guard, we have the width of a single bit, we can now read the next 7 bits and get their value.
We obtain here space-space-space-bar-bar-space-bar, that is to say we have 0001101, and according to our table it is the value 0.

Here are two more barcode images I used:


I tried with other images as well but you can generate your own barcodes online if you want.

Now read part 2 for the first part of the implementation.

OpenCV - Rotation (Deskewing)

In a previous article I presented how to compute the skew angle of a digitized text document by using the Probabilistic Hough Transform. In the last article I presented how to compute a bounding box using OpenCV, this method was also used to compute the skew angle but with a reduced accuracy compared to the first method.

Test Set

We will be using the same small test set as before:

The naming convention for those images is simple, the first letter stands for the sign of the angle (p for plus, m for minus) and the following number is the value of the angle.
m8.jpg has therefore been rotated by an angle of -8 degrees.

Bounding Box

In this article I will assume we have computed the skew angle of each image with a good accuracy and we now want to rotate the text by this angle value. We therefore declare a function called deskew that takes as parameters the path to the image to process and the skew angle.

void deskew(const char* filename, double angle)
{
  cv::Mat img = cv::imread(filename, 0);
 
  cv::bitwise_not(img, img);
 
  std::vector<cv::Point> points;
  cv::Mat_<uchar>::iterator it = img.begin<uchar>();
  cv::Mat_<uchar>::iterator end = img.end<uchar>();
  for (; it != end; ++it)
    if (*it)
      points.push_back(it.pos());
 
  cv::RotatedRect box = cv::minAreaRect(cv::Mat(points));

This code is similar to the previous article: we load the image, invert black and white and compute the minimum bounding box. However this time there is no preprocessing stage because we want the bounding box of the whole text.

Rotation

We compute the rotation matrix using the corresponding OpenCV function, we specify the center of the rotation (the center of our bounding box), the rotation angle (the skew angle) and the scale factor (none here).

  cv::Mat rot_mat = cv::getRotationMatrix2D(box.center, angle, 1);

Now that we have the rotation matrix, we can apply the geometric transformation using the function warpAffine:

  cv::Mat rotated;
  cv::warpAffine(img, rotated, rot_mat, img.size(), cv::INTER_CUBIC);

The 4th argument is the interpolation method. Interpolation is important in this situation, when applying the transformation matrix, some pixels in the destination image might have no predecessor from the source image (think of scaling with a factor 2). Those pixels have no defined value, and the role of interpolation is to fill those gaps by computing a value using the local neighborhood of this pixel.
The quality of the output and the execution speed depends on the method chosen.

The simplest (and fastest) interpolation method is INTER_NEAREST, but it yields awful results:
.

There are four other interpolation methods: INTER_NEAREST, INTER_AREA, INTER_CUBIC and INTER_LANCSOZ4.
For our example those 4 methods yielded visually similar results.
The rotated image using INTER_CUBIC (bicubic interpolation):

Cropping

We should now crop the image in order to remove borders:

  cv::Size box_size = box.size;
  if (box.angle < -45.)
    std::swap(box_size.width, box_size.height);
  cv::Mat cropped;
  cv::getRectSubPix(rotated, box_size, box.center, cropped);

As mentioned in the previous article, if the skew angle is positive, the angle of the bounding box is below -45 degrees because the angle is given by taking as a reference a "vertical" rectangle, i.e. with the height greater than the width.
Therefore, if the angle is positive, we swap height and width before calling the cropping function.

Cropping is made using getRectSubPix, you must specify the input image, the size of the output image, the center of the rectangle and finally the output image.
We use the original center because the center of a rotation is invariant through this transformation.
This function works at a sub-pixel accuracy (hence its name): the center of the rectangle can be a floating point value.

The cropped image:
Cropped
To better understand the problem we have with positive angles, here what you would get without the correction:


We can immediately see that we just need to swap the height and the width of the rectangle.

Display

This is a small demo so let's display the original image, the rotated image and the cropped image:

  cv::imshow("Original", img);
  cv::imshow("Rotated", rotated);
  cv::imshow("Cropped", cropped);
  cv::waitKey(0);
}

That's it ! It's really simple to rotate an image with OpenCV !

OpenCV - Bounding Box & Skew Angle

In a previous article I presented how to compute the skew angle of a digitized text document by using the Probabilistic Hough Transform.
In this article we will present another method in order to calculate this angle , this method is less acurate than the previous one but our goal is rather to introduce two new OpenCV techniques: image scan with an iterator and computing the minimum bounding box of a set of points.

Bounding Box

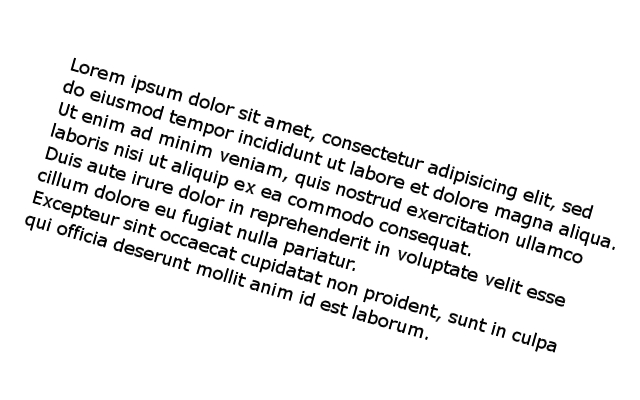
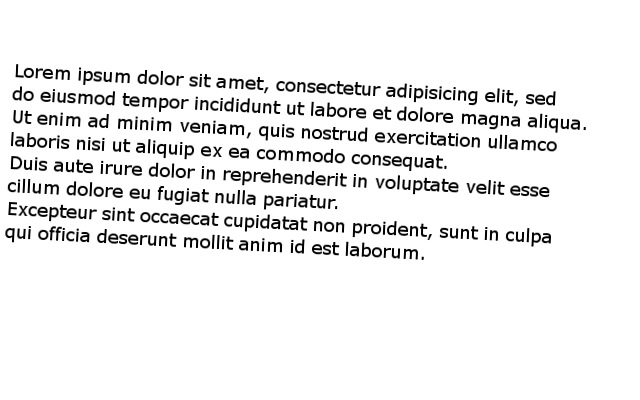
The minimum bounding box of a set of 2D points set is the smallest rectangle (i.e. with smallest area) that contains all the points of the set. Given an image representing a text, like this one:

The points of our 2D set are all the white pixels forming the different letters.
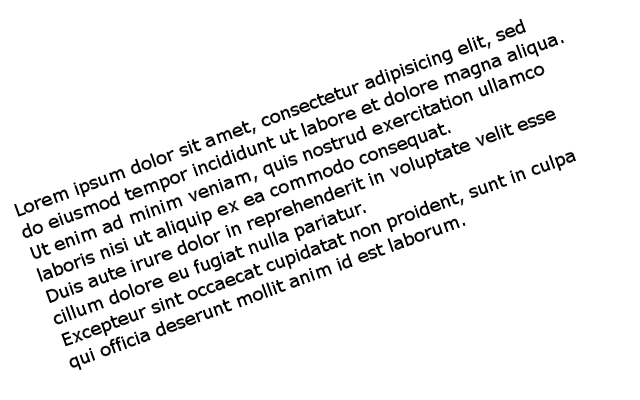
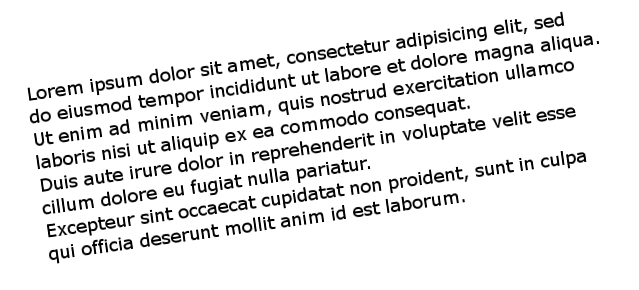
If we can compute the bounding box of this set, it will be possible to compute the skew angle of our document. Given a bounding box of our set, it will also be easy to extract our text from the image and rotate it (probably in a future article).

Preprocessing

Our text is small but we have a large number of points, indeed the resolution of our image is large, we have many pixels per letter. We have several possibilities here: we can downstrongle the image in order to reduce its resolution, we can use mathematical morphology (i.e. erosion), etc. There are certainly other solutions, you will have to choose one depending on what are the previous or next stages in your processing pipeline (e.g. maybe you already have a downstrongled image).

In this article I have chosen to experiment using mathematical morphology for this problem.
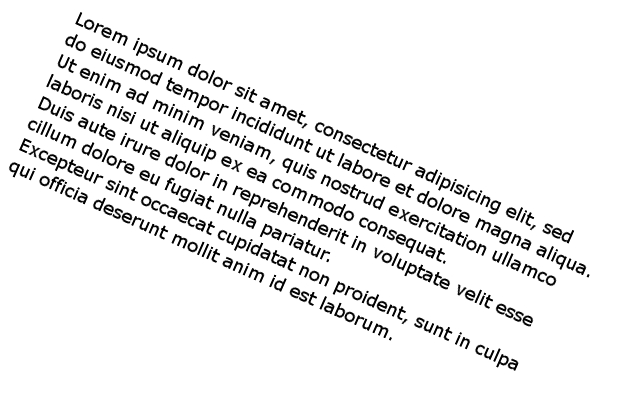
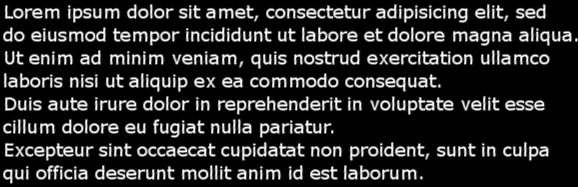
We used a 5x3 rectangle shaped structuring element, that is to say we want to keep pixels that lies in a region of white pixels of height 3 and width 5.
Here is the result on the previous image:

Okay, this erosion was really aggressive, we removed most pixels and in fact only some letters "survived" the operation. Calculating the bounding box will be really fast but we may have stripped too much information, it might cause problems on certain images. However as we will see, there are still enough pixels to get decent results.

Implementation

The OpenCV program is similar to the one presented in the previous article.
We declare a compute_skew function that takes as input the path to the image to process, at the beginning of the function we load this image in grayscale, we binarize it and we invert the colors (because objects are represented as white pixels, and the background is represented by black pixels).

void compute_skew(const char* filename)
{
  // Load in grayscale.
  cv::Mat img = cv::imread(filename, 0);
 
  // Binarize
  cv::threshold(img, img, 225, 255, cv::THRESH_BINARY);
 
  // Invert colors
  cv::bitwise_not(img, img);

We can now perform our erosion, we must declare our rectangle-shaped structuring element and call the erode function:

  cv::Mat element = cv::getStructuringElement(cv::MORPH_RECT, cv::Size(5, 3));
  cv::erode(img, img, element);

Now we must create our set of points before calling the function computing the bounding box. As this function cannot be called on an image, we must extract all the positions of our white pixels, this is a great opportunity to present how to scan an image using an iterator:

  std::vector<cv::Point> points;
  cv::Mat_<uchar>::iterator it = img.begin<uchar>();
  cv::Mat_<uchar>::iterator end = img.end<uchar>();
  for (; it != end; ++it)
    if (*it)
      points.push_back(it.pos());

We declare a vector of points in order to store all white pixels. Like when we iterate on a container in C++, we must declare an iterator and also get the iterator representing the end of our container. We use the Mat_ class, note the underscore at the end: it is because it is a templated class: here we must precise the type of the underlying data type. The image has only one channel of size 1 byte, the type is therefore uchar (unsigned char).

We can now use the OpenCV function in order to compute the minimal bounding box, this function is called minAreaRect, this function need a cv::Mat as input so we must convert our vector of points.

  cv::RotatedRect box = cv::minAreaRect(cv::Mat(points));

That's it, we have our minimal bounding box!
We can now have access to the angle:

  double angle = box.angle;
  if (angle < -45.)
    angle += 90.;

During testing I notice I only got negative angle and never below -90 degrees. This is because as we have no reference rectangle, there are several ways to compute the rotation angle. In our case, if the angle is less than -45 degrees, the angle was computed using a "vertical" rectangle, we must therefore correct the angle by adding 90 degrees.

Finally, we will display our bounding rectangle on our eroded image and print the angle on standard output:

  cv::Point2f vertices[4];
  box.points(vertices);
  for(int i = 0; i < 4; ++i)
    cv::line(img, vertices[i], vertices[(i + 1) % 4], cv::Scalar(255, 0, 0), 1, CV_AA);
 
  std::cout << "File " << filename << ": " << angle << std::endl;
  cv::imshow("Result", img);
  cv::waitKey(0);

Note that the line was anti-aliased using CV_AA as the last argument of cv::line.

Results

Using the same 5 images as in the previous article, we obtained the following angles:

The naming convention for those images is simple, the first letter stands for the sign of the angle (p for plus, m for minus) and the following number is the value of the angle.
The results are not as good as in the previous article, especially with a large angle. Indeed with large values, our preprocessing step (the erosion) will be less meaningful because pixels of a single letter are not vertically or horizontally aligned at all.

Note that the bounding box obtained is not the bounding box of our whole text. The erosion removed a lot of information, if we try to match the bounding box on the initial text, we will lose for example the upper part of letters with a larger height that other letters (e.g. f, t, h, d, l...). Compute the bounding box on the unprocessed text (or use a smaller structuring element) if you want the bounding box of the whole text.